Wednesday, April 15, 2009

Office Transformation

I love amazing transformations!! They motivate. They bring life into a dead space. They help someone (or many people) become more productive. There is order. It is beautiful to see the treasures on display. You can find things. It is a gift. Oh, the list goes on... It is why I LOVE to organize!

I could not wait to show these astonishing before and after pictures of a client's home office. Now remember, all of this was done using the basic organizing steps - sort, go through each pile, find a home, contain & label, keep it simple...and then plan to maintain. Following these steps will lead you to organizing just about anything!


We moved the lighter shelf to the other side of the office to go with it's match. Are these black shelves not sooo cute?? My client is talented at decorating...and you can see the treasures!


Notice the shelves have a home for everything and it is all labeled! Off to organize...have an amazing day!

Tuesday, April 14, 2009

Recent Conversations

I had the privilege of giving an Organizing Presentation to the Greater Kansas City Mother of Twins Chapter last night. There were over 40 moms present. I presented on Why We Need To Organize and The Basic Organizing Steps. Then we looked at before and after pictures and walked through the steps of organizing each photo. We learned how to set up an "Action File" to conquer the overwhelming amount of paper in our homes. After some question/answer discussion we had a drawing for a beautiful bouquet of Gerber daisies and lime (my favorite color) mini mums AND for two free hours of organizing services. Congratulations to the winners!!!

I wanted to post some links below that will answer some of questions that we discussed last night!

1. How long should we keep bills, taxes, receipts, etc?

First, always speak directly to your accountant regarding your specific issues but these links have some great guidelines:

2. My favorite website for product searches and ideas:

3. Here is some garage organization information:

I hope this information was helpful! Thanks again ladies for a wonderful evening!

Monday, March 23, 2009

Monday's Product Review

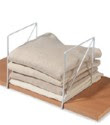
Each Monday I will try to post a picture of a product that I have used or a client has used that I "approve of!" This week it is the shelf divider:
Shelf dividers are easy to use AND inexpensive (2 for $6.99 at the Container Store). I love putting kids clothes on shelves or in visible places rather than drawers, if possible. This allows them to "see" what they have plus the drawer doesn't get so jumbled with messy, and now wrinkled, clothes. Here is an after picture of a closet where we used shelf dividers...

Kids can easily put their folded clothes away and pick out what they want to wear. If your closet doesn't have shelves try using a hanging clothes organizer like the one below from Target for only $19.99.
I put folded t-shirts, shorts, sweaters and other clothing items on each shelf.
Now you can go and organize a couple shelves and hopefully the shelf divider will complete the project. Have fun organizing!

Wednesday, March 4, 2009

Fabric

I wanted to post the finished fabric pictures from the quilting studio I had blogged about previously.

Megen wanted to be able to see her beautiful fabrics. She purchased shelving at an estate sale and after sorting through all of her fabric, purging what she no longer wanted, separating it into hues and folding it uniformly she was finished.

These are the before pictures...


This is the new fabric zone...No more digging through the cabinets and forgetting what she had hidden in the back. She can see every piece of fabric, be inspired and enjoy them daily!


Sunday, February 22, 2009

Ideas for Trophies and Ribbons

Receiving ribbons and trophies are a huge confidence booster for children.
But what do you do with them all???
Here is an idea for displaying your child's plaques, ribbons, medals and trophies!!

Remove your curtain and tie a string or wire across the window. Get it as tight as you can. Here we tied it in between the shelf supports but you could use a screw or nail on each end of the window. Then loop all the ribbons through their own strings around the wire. We hung medals on the ends of the shelf, hung plaques on the wall and put trophies on the shelf to make a complete "Award Display."

Another idea is to center the display around a bulletin board or shelving.


Have fun with it. Be creative. Let your kids give you their ideas. Send me pictures of your creative displays.

Thursday, February 19, 2009

The Guest Room/Office Transformation

I love what I do...helping people accomplish a task...transform a space... organize...provide peace of mind...transfer skills... whatever you call it, I LOVE it!

My clients are very capable, smart and talented people! They could do what I help them to do but many have said that this scheduled time, the extra set of hands, a focused perspective and experienced ideas are what gets the projects done!

A recent client who has three children and a full life had gotten overwhelmed and wanted help with her spare bedroom/office. She wanted her guests to have a clean, welcoming place to stay and for herself to have a place to do her work that was inviting. Some of the things that were being stored in the room were her children's memorabilia, family photos, paperwork, family history memorabilia and some things that she knew she could get rid of but just hadn't had the time to get through - a couple old file cabinets, pictures she wanted to sell on eBay, etc.

Here are the stunning before and after photos:


We went through the organizing steps: sort, purge/go through each pile, decide on where to store things, contain them, and finally enjoy the finished product!!

Obviously everything in the room didn't just disappear. The things that she kept - children's memorabilia that is now organized by year - and family history and photos are stored in clear, labeled plastic bins. There was a closet that was being used to store blankets and pillows that now houses these bins under a couple of the blankets!


The rest of the items had a home already elsewhere in the house or were donated, returned to someone else or placed in the trash.

Ahhhh, let the guests come visiting! And, let the goals get accomplished in an office like that!

Tuesday, February 10, 2009

A Stuffed T-shirt Drawer?

This file drawer reminds me of my husband's old T-shirt drawer. His drawer was so stuffed full that I never wanted to put fresh, clean, well-folded shirts into it because I'd have to smash them in and crush down the piles just to get the drawer closed!!


Just like a stuffed full t-shirt drawer these files were stuffed full and rarely used. Nothing could fit in them and they were visually unattractive...which makes filing unappealing!

THE PROBLEM:

That's why I was called...to solve the problem: setting up a paper system...a flow for paper when it comes in the office and to create the file drawers. Where do you put things? Which files should go in which drawers? What do you do with reading material? Where should my briefcase go? Do I need to keep this?

THE PROCESS:

To solve the problem requires understanding it. My client and I talked through the papers, categories, job requirements, frustrations, factors involved in the position (competitors, partners, reference/historical papers to keep, reports, etc). We looked at the space available. I made a plan for each area using some general rules: keep action files closest to the desk, store historical data farthest from your work area, have a "home" for each item.

Then came the organizing process. We sorted all the paper in the office and cleaned out and sorted through all the drawers. I used post-its and made notes on the papers as we pulled them out so we knew what they were. This helped file faster at the end. A LOT of papers went in the trash.

Then, I wrote all the files in their categories and subcategories on the dry erase board. This way we could move things around and the client had a visual picture of what his files would look like - a road map.

Next, we made the files tabs. Smead Viewables (from Office Depot) are what I used for the main category tabs. These are tall, can be read from the front, side and back and are colorful and easy to make. For the subcategories I designed a template that had colors to match the Viewables. I read them off the board as my client typed them in the computer. After diligent fine motor skills the files were finished.
THE RESULT:
Here is one of his four file drawers.


You may notice that there are limited manila folders. I know for some things, especially those things that you pull in and out a lot, you might need a couple. Visually, I love the clean look with out them.

A fresh perspective, the right tools, a plan and hands-on help took these files from the "stuffed t-shirt drawer" look to a "glass front kitchen cabinet" look (you know the ones on Martha Stewart with all white matching dishes spaced evenly - crisp and clean)!! I think I would want to leave the drawer open just to see how awesome it looks. Filing in them would be a highlight of the day, don't you think? Read my client's testimony on my website's home page.

I am always so inspired by my clients that I went home and redid one of my own file drawers!

Be inspired yourself!!