I wanted to explain
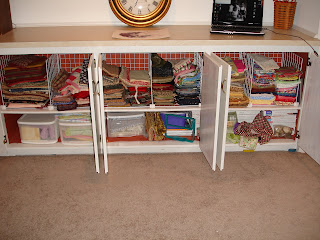
the 123's of organizing just about anything. I will feature before and after pictures from Megen's quilt studio. Below is the row of cabinets that line one wall of her studio.

The
first step is to
create a plan for your space! Ask yourself questions like, "What is this space to be used for?", "What would this space look like if my dreams came true?", "What activities are going to happen in this space?". Plan out "zones" for the different activities that will take place in the room. Try and keep supplies and furniture for those activities in their "zones."
One of Megen's dreams for her studio was to have her beautiful colored fabrics displayed on shelves. Currently they were in these cabinets and hard to see, find and remember what was there.


The
second step is to
sort! We sorted through all of the fabric, supplies, projects, and miscellaneous things. Create piles all over the room. The great thing about sorting is that you
don't have to make any decisions. Don't worry about what you should keep or get rid of. Just sort.
The
third step is to
go through your sorting piles. Ask yourself, "Do I need this?", "Have I used this in the last year?", "Do I love this?", "Does this make my life better?", "Does it fit with the "zone" I have planned for this space?". You will work through this step with ease if you have thoroughly completed step one.
Steps
four and more entail
finding a home for your things,
containing them,
labeling them, and planning a way to
maintain them.
We proceeded with step three on Megen's fabric and Works in Progress (WIP). Now, seeing them all in front of her, she could easily decide what to keep and what to donate. We contained all of her projects in the containers that she already had. We labeled them and made a master list that she could refer to when deciding what project to tackle next. These WIPs took up three of the five available cabinets. Pictured is one of the three cabinets.

Removing all of Megen's fabric freed up a lot of Megen's cabinet space. Because her second grand baby was on the way, she was changing her guestroom to a grandchild room. This entailed cleaning out a closet where she kept all of her scrap booking supplies. We planned a "scrapbook zone" for the last two cabinets and continued through steps 2, 3, 4 and more. Now, whenever Megen wants to scrapbook, she can use a table by the cabinets and have all of her supplies at her fingertips.


Think about a project that you want to organize. It can be something as small as your purse. Start with step
one:
plan. Continue with step
two:
sort, step
three:
go through each pile, steps
four and more: decide on a home, contain, label and make a plan to maintain. You will be amazed how easy it is when you follow the 123's of Organizing!


.jpg)


