Showing posts with label before and after pics. Show all posts

Wednesday, October 27, 2010

Small Project - Organizing a Bathroom Countertop

Are you ready to tackle a small project? The bathroom countertop can be a constant mess challenge. It gets used every day - most likely twice a day! Removing everything from the counter and storing it in a cabinet would be great but the reality is that it becomes a pain (in the back) to bend over and pull things out of a lower cabinet AND then to bend over and put them back twice a day! Most people will not maintain that system and the countertop returns back to being a mess unorganized! That is why I am a fan of "reality" organizing.

Here is an example of a real life countertop that is unorganized. Can you relate at all!? Stuff has accumulated...and now it is crammed in the corner...somewhat of an eye sore to start your day!


In addition to looking bad it tends to be unclean, too, because wiping down the countertop means lifting each item separately...a time consuming activity.

"What is the best way to organize this?" you ask. Here are a few guidelines:

  1. Sort your countertop items into two piles:
    • what you use everyday or at least every other day
    • what you use less frequently
  2. Ask yourself if you have more countertop space, back of the door space or wall space. This helps you decide if you should use the wall to store regularly used items (in a cabinet that you hang or mount), the door (in an over-the-door organizer with individual pockets), on the countertop (in a container), or a little of all three!
  3. Choose products that are ATTRACTIVE to you AND durable and the right size to hold your items.
Pretty simple, eh? Here is the after picture of this countertop:
 

Is that not the cutest basket? It was purchased at Pier 1 for $10.00. The webbing is a plastic-y material so that if it does get wet it won't ruin the container. Try using a temporary container first - an old tupperware or planter to check size and see if you even like it before going and purchasing something. Then you can take the temporary container with you to find just the right size!


From now on the countertops can remain organized, kept clean easily and if you want to clear it off for company it takes just one hand to move the basket inside a cabinet!!!

How do you keep your bathroom countertop organized?

Tuesday, August 31, 2010

Delayed Decisions in the Basement

Check out our Facebook page - AND become a fan, please (by pressing the "LIKE" button)!! Eighteen photos have been uploaded in perfect "before and after" order of our precious client's basement. Sit back and enjoy them and imagine transforming your space into usable, efficient, BEAUTIFUL living space!

Remember, anytime you delay making a decision about what to do with something you are creating clutter! Try making three decisions today about what to do with your things. Tell me about it by posting a comment below.

Monday, August 30, 2010

Organizing Your Recipes - Part II

In Organizing Your Recipes - Part I I shared 5 steps to organizing your recipes using my organizing acronym SPASM. Following those steps you should have all of your recipes into sheet protectors by category with a tab in front of each main category.

Now we will label each tab. I use the white tabs that come with the insertable plastic dividers. I print out the category name on my label maker and stick the label onto one of the tabs. I wrap the excess label around the back of the tab if there is any so that I don't spend time cutting down the length. But, you could write your category on the tab or print out labels on card stock and cut them out. Here is a picture of my tabs.


Notice that I have BARS separate from cakes and cookies. In my recipe box I would always wonder which category my lemon bar recipe or my Loui's Ooey Gooeys recipe would be under. I LOVE it that I can have my own tab for BARS!!!!! That is the great thing about customizing your binder. It fits YOU!

Next, I wanted them to look great. I went on my computer to create a cover and a spine for the binder. I found an attractive photo and font and made the cover. I printed it on photo paper which I think makes a huge difference in the appearance.

Then I used a text box, adjusted the size to match the spine's width and length and typed out the categories in each binder. I wanted to easily see which binder I needed to pull off my shelf to find the recipe I would be looking for.


Now your binders are ready for your shelf. I keep mine in a cabinet but am considering where I could put them out because they make me so happy! :)


The great thing about a binder for your recipes is that you can use various size sheet protectors to add recipes. Here is a recipe printed off the computer in an 8 1/2 X 11 sheet protector. You may have a lot of recipes like that. GREAT! Just insert those behind the right tab.

What if you print a new recipe off or rip an article out of a magazine that you want to try? I would suggest you put it in the tab folder before inserting it into a page protector. That way when you plan out your next week's menu you will see that you have a new recipe to try and will schedule it into your menu!


This weekend I was craving my favorite Bran Muffins so I pulled out my binder and under BREAD I found it! It was so fast and enjoyable just looking for the recipe! My daughter helped my make them. I didn't even take the recipe card out. I just left the binder out on the stove. All the recipe cards are protected behind plastic.

PLEASE share with me how you organize your recipes. And, of course, send pictures of your new binders if this post has motivated you to organize your recipes!!
As promised in Part I here is my favorite bran muffin recipe...

Simply Squared Away's Bran Muffins
In mixing bowl stir bran and milk. Let stand 1-2 minutes.
2 1/2 cups Bran Flake cereal
1 1/4 cup milk
Add egg and oil to bran mixture stirring.
1 egg
1/4 cup oil
In separate bowl mix dry ingredients.
3/4 cup whole wheat flour
3/4 cup white flour
1/2 t salt
1 T baking powder
1/2 cup sugar
(I add 1/4 cup ground flax seeds)
Mix dry ingredients with wet JUST until combined. Put into muffin tins. Bake at 400 degrees for 18 minutes. Eat fresh and hot with butter.

Saturday, August 28, 2010

Organizing Your Recipes - Part I

I knew it was time to organize MY recipes because...

  • My recipe box looked like this! Ugh! It was crammed full with recipe cards, torn slips of paper and recipes printed on full sheets of paper folded up! The tabs were worn and bent. AND, the lid kept falling off!!


  • Every time I needed to find a recipe I had to grab the whole category (e.g. main dishes) and look at each title one by one to find the recipe I wanted. OR, I had to sift through loose recipes and papers.
  • I had so many recipes in each category that as I scanned the titles I would think, "I should throw that out. I have never even made that! That looks too hard. That doesn't even sound good."

I finally had the time to work on this project. I had some of the supplies I needed and then actually remembered (wow!) when I was out running errands to look for the 3X5 page protectors. Here are the supplies I used:

  • A Binder - I used a 1 1/2 inch and a 1 inch binder. I later switched this blue one to a white one so the two binders matched. In part two I will show you the after picture of my awesome recipe binders! :)
  • 3X5 page protectors - I like the 3X5 size because my cards are that size (duh!) and because there are 4 per page (the 4X6 only have 2 per page). I found mine at Office Depot. I bought 10 packages just so I wouldn't run out.

  • Dividers - I LOVE this kind. They have 8 dividers and each one has pockets - I will talk about how to use the pockets later.


So, let's get STARTED!!!

The 1st step in organizing is to...SORT! Since recipes in a box are already sorted I sorted my loose papers/recipes into the existing categories in the box. Then I took one category (i.e. main dishes) at a time and sorted them down further: Chicken, Beef, Ham, Italian, Mexican, etc. Please note that I continued with step 2 and 3 for each main food category before starting the next.

The 2nd step in my organizing acronym - SPASM - is to PURGE! Get realistic. If you haven't tried a recipe in a year don't keep it. If you decide to keep it then get it on your calendar and buy the ingredients. When you have whittled it down to those you want to keep you are ready for step three!

The 3rd step is the A - ASSIGN A HOME! Each main category's 'home' will be after it's tab divider. Place the first tab into your binder. Use a sticky note to label this tab temporarily until you are certain that this is the order you are happy with. Before placing your recipes into the protectors decide how you want to order the recipes/mini categories. I put them into the sheet protectors by mini categories. For example, I choose to put my chicken recipes in first with my favorite chicken recipes in the front. Then I put my beef recipes in with my favorite beef recipes in the beginning. And so on... There were a couple of blank pockets after each mini category so I would have room to add recipes later.

CONTINUE this process until all of your recipes are in the binder(s) with each main category behind a new tab.

The 4th step is to SET LIMITS. Try and think of natural limits that help control your stuff. Here, it could be the actual binder - once the binder is full you must purge. Or, another limit could be the number of page protectors per section - for example, 5 pages per category, etc.

The 5th step is to MAINTAIN. Here again try and think of natural occurrences where maintenance could occur. For example, with a closet you could maintain each time you wash clothes, each season when you switch seasonal clothing, each time you bring a new item in, etc. With your recipe binder(s) you can maintain each week when you menu plan or whenever you pull your binder off the shelf.

In Organizing Your Recipes - Part II I will talk about labeling the tabs, creating the cover and spine, and what to do with new recipes coming in! I will even post a picture of the first time using my new binder AND a favorite recipe!

Monday, August 16, 2010

Hangers: Can they change the way you FEEL??

Okay, I have to admit that I have not organized, or even purged, my own closet in the last two years! Well, maybe an item removed here or there but nothing big. I have walked into it several times ready to do some purging but stood there unsure where to start and decided I didn't have enough time, felt overwhelmed and turned around and walked out. Can you relate to that? I had these images in my mind of a complete closet restructure/makeover but when reality hits the closet is the last thing to get done.

The other day I was out returning something at Kohl's when I saw these hangers - the ones in all the pictures, sleek black velvet to keep clothes hung up, thin to create more room in your closet. I was inspired to once again organize my closet and since the hangers were on sale (and I had a coupon) I purchased them!

If you have stood at the door of your messy closet and felt overwhelmed and stuck here is the one, magical tip that helped me get started and keep going AND it can help you, too:

Organize and purge by color.

This makes it EASY to do a little at a time. It is EASY to get started. It is NOT overwhelming. Here is my step by step...

1. I grabbed all my white clothes - shirts, sweater, jackets, etc (I did pants/skirts separate). I placed the white pile on my bed and went through one piece at a time. Do I wear this? Is it in good shape? Does it fit good? Will I wear it next season? Answering those questions directed the piece to the donate pile OR I switched hangers and put it in my "keep" pile.

2. When I finished the white pile I grabbed the white "keep" pile off my bed, hung it at the front of my closet, arranged it in the order I wanted - I like short sleeve, sweater, jackets...

3. Then, grab the next color. It is easy to pick another color because color stands out. Choose a color you have less of. That way it is not overwhelming to go through a pile of five items verses 75.

4. Decide if it goes in the donate pile or "keep" pile, switch hangers and move to the next piece. Once that color is finished take the keep pile with nice, new hangers and place it next to the white clothes in the closet. Arrange in the order you like. Choose another color and repeat.

5. You may find an item that needs mending. Make a hard decision here. Are you going to take it to the seamstress right away or will it sit in a pile for a year cluttering your space. If you won't likely deal with it then donate it and move on.

6. I finished the process with black because I had a lot more black items.

7. Then move to pants and skirts. I fold some pants and shorts so once I finished with my hanging items I started on my shelves. The hangers were so beautiful to look at AND my clothes were color coordinated...I gained momentum and inspiration to keep going.

The great thing is that if time is running out and you need to move on to another activity you can easily come back to this project and just start in on another color!

Here is a section of my closet before (yes, a little embarrassing):

And, here is the same section after:

The hangers DO change the way I feel...EVERY time I walk into my closet!!

Sunday, July 25, 2010

Organizing a Toy Room

I LOVE before and after pictures!!! Don't you? They inspire! They help you remember what life was like "before"! They remind you of the potential! They motivate you to move to the next space! They even help you remember to maintain!

I have the honor of sharing some before and after pictures of my client's basement (by the way, have I shared that we have been organizing a lot of basements lately?). In the next few weeks I will post the rest of the pictures but today we will see just the zone designated as the play area/therapy room.

This wonderful family has been blessed with four children - two of which have autism. The last five years have been a whirlwind of emotion, therapy, paperwork, learning, hard work, challenging times and joy filled moments for them. In the midst of all that some things were set aside - one being the home. Now, as the family comes to a point where they can focus on their home they have called me to help. I LOVE HELPING!

The basement was an area where things were taken and left until...later! When you stand and look at an area in your own home begin by asking yourself what will take place in this area. This basement needed to have 4 areas, or zones:
  1. Toy/therapy
  2. Workout/exercise
  3. Relaxing - TV/books
  4. Game room

Once we talked this out we could begin the organizing process:

  • Sort
  • Purge
  • Assign a home
  • Set limits (with containers, shelves, etc)
  • Maintain

Remember my acronym SPASM? If not read about it here.

Here it is...what was once the office and holding area is now a bright and cheery playroom used for play and for therapy!

BEFORE:


AFTER:

Amazing, eh?

Monday, April 12, 2010

"The Cabinet"

Do you have one of these cabinets...It is the catch all place for all office supplies, phone books, papers of all kinds, markers, kids crafts, cords, electronics, etc. Usually it is around the area you handle the mail. For most it is in the kitchen near a desk...

I wanted to show one of my client's NEW, organized cabinet. Too bad I forgot to take a before picture so that you could see how full of papers and stuff it was - unrecognizable. But we all have something like it...somewhere. And even the most organized people out there have to consistently maintain this special cabinet.

This cabinet is great because it has adjustable shelves. If you look closely you will see that we put the black notebooks in a clear-ish magazine holder turned on its side so they wouldn't fall over. Most of the paper that was smashed in the cabinet was thrown out or moved to permanent files but the white binder with clear sheet protectors keeps important documents.

My client found the Clear AkroBins on the left at The Container Store. We labeled them for the various things she wanted to keep near her kitchen/desk area: markers, pencils, nail supplies, office supplies, money, postage, etc. The top shelf has four areas reserved for stationary, pet supplies, cameras/cords, and checks.

To start a project like this on your own use my organizing acronym "SPASM" to help...

  1. Pull out the things in your cabinet one by one and Sort them into piles. Use a sticky note to write each category name near the pile so you don't forget. You may have categories like crafts, paper, phone books, addresses, office supplies, etc.
  2. Purge each pile. Throw away, donate or recycle all that you can.
  3. Now Assign a home to each category. Do you want to keep it in this cabinet? This step is a little like a puzzle - figuring out how and where each item will fit into the cabinet. Try it different ways until you come up with a solution you like.
  4. Next, Set limits by using containers. Decide what kind of containers you need. Try items you have around the house - old Tupperware, cups for pencils, shoe boxes - just to see how it fits. Then you can search the stores or online to find just the right containers. Set limits with statements, too. Say, "I will only use this area for stationary (or pens, phone books, post-its). When it is full I will purge and donate some to make room for the new."
  5. Lastly, Maintain! This is key to continued organization. When you notice it is getting messy follow this acronym again. Maybe you will have to make some changes, add a new category or move a category to a different location.

Have fun! Send me before and after pictures of your project! Enjoy the results but don't waste too much time staring at your beautiful cabinet!!

Wednesday, December 9, 2009

Shelf Dividers

I LOVE shelf dividers! You can order them from The Container Store for about $7.00 a pair. They really do their job - which is to keep your shelves orderly! I also LOVE before and after pictures and have included some from a recent client's armoire. We used shelf dividers to keep her beautiful sweaters organized!


Monday, November 30, 2009

Jewelry Perfection!

Ever wonder what to do with all of your jewelry?? Before deciding, think through this question: Do you have more drawer space, closet hanging space or more wall/over-the-door space? Once you figure this out there are three types of products I would recommend...

If you have more drawer space I would suggest velvet, stackable jewelry organizers that can be found at Bed, Bath and Beyond or other similar stores. They have a wide variety for rings, bracelets and necklaces.

If you have more room in your closet hanging from a rod try this Hanging Pocket Jewelry Organizer. There are a several places to find these with a lot of variety as well.

If you have room behind your closet door or wall space in the closet, or close by, try this Over-the-Door Organizer with the option to mount it on the wall. It has a LOT of room for all types of jewelry! Here is a picture where I used it with one of my clients.


Whatever your unique jewelry situation think through which option would be best for you and have fun organizing, and possibly discovering, all of your jewelry!

Friday, November 20, 2009

Easy, Remarkable Solutions

I have three simple additions to any child's (or adults!) room to help bring order and simplicity! Plus, some real life before and after pictures where I used these products. They will magically ADD space, give amazing visual transformations and provide the structure that will help you stay organized.

First, are the Drawer Dividers. They are spring loaded and you insert them in your drawers to separate your clothes. They come in a wood look also. My girls and I love them. Try them in your sock and undergarment drawer!


Second, if you have a small closet rod OR lots of clothes try adding an additional Double Hang Clothes Rod below your current one! Especially with kids clothing this product works great and even allows a younger child to reach their own clothes!

The third product is the Over-the-Door Shoe Hanger! Behind the door is a space that is often forgotten. In the after picture below we used it for hats and other miscellaneous things in addition to the shoes!


Also, notice the shirts folded once and stacked on the closet shelf. If there is not enough closet space to hang all the little shirts try folding them and stacking them on a shelf. This way you can see each shirt AND you only have to fold them once - in half!! In a drawer you can only see the top shirt! So, here are three product ideas with the links to where I found them. Now you are ready to start organizing your bedrooms! Be inspired!

Thursday, October 22, 2009

Office Revamp

Traveling a lot, not having systems in place that work, waiting until clutter builds up and being overwhelmed with where to start can turn your home office into a place you would rather not go! That is how my client felt and that is why she asked for help. Following the basic organizing steps we transformed her home office into a place where she can get projects completed and even enjoy spending time there! Have fun looking at these before and after photos!


Organizing Girl's Hair Pretties

One of my friends calls hair accessories "hair pretties" so that is how I titled the post!

A recent client has three daughters. They have LOTS of hair pretties. They had tried to find a way to organize the cabinet where they kept these things but nothing ever worked and the cabinet would always end up a mess with all the hair pretties piled in!


Here is what we did with just two three drawer organizers that you can find at Target for $9.99 each and some Velcro and ribbon! Her daughters LOVE it and they LOVE to keep it CLEAN!

We sorted through all the hair things which was probably the most time consuming. Then we labeled the drawers for each type: ponies, head bands, ponies with decorations, clipies, etc. We attached ribbon to a piece of Velcro at the top and bottom and then attached it to the inside of the cabinet door. The Velcro has adhesive on both sides so we didn't even need glue. Then we clipped all the bows to the ribbon.

Simple. Cute. Organized.

Friday, August 21, 2009

Project Garage

Across America there is a common phenomena...Garage Overload! Maybe you can relate to that overwhelming feeling you get when you open the door to your garage. "How can I ever fix this??" you ask. So, what happens? You close the door and go on with life leaving 'project garage' for another time. The weight of knowing something needs to be done is heavy on your brain now causing emotional clutter as well as physical clutter!

Here are some pictures from the real life garage of the Russell family. They are an active family that enjoy camping, hunting, fishing, BBQing and boating plus they have all the supplies to go with their hobbies. They also have grown children and are storing some of their transitional things temporarily. After 30 years in the same house the garage had become...full, to say the least.

Here are the before, middle and after pictures of their 'project garage'. Along with one other hard-working, family friend with lots of muscles, Maggie Russell and I tackled the project!! Her brother Jim helped whenever he could, too. We worked almost six hours one day and only two and a half hours the next and after 30 years Maggie can now open the garage door with pride AND park there, too!!!
Three before pictures:
This was in the middle of the project. We had taken everything out of the garage. As we did we sorted it all into categories. Can you tell?
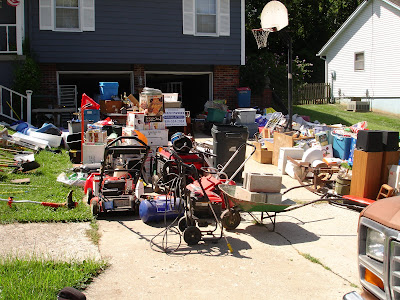
Can you believe this is the same garage? They remembered it looking like this 30 years ago when they moved in.
These are the finished photos! There is still one group of transitional tubs and a few pieces of furniture that they need to go through and move to a permanent location. All the gardening, automotive and paint supplies are on these shelves, in tubs and labeled: All camping, fishing, boating and hunting supplies are on these shelves:Be inspired!

Wednesday, April 15, 2009

Office Transformation

I love amazing transformations!! They motivate. They bring life into a dead space. They help someone (or many people) become more productive. There is order. It is beautiful to see the treasures on display. You can find things. It is a gift. Oh, the list goes on... It is why I LOVE to organize!

I could not wait to show these astonishing before and after pictures of a client's home office. Now remember, all of this was done using the basic organizing steps - sort, go through each pile, find a home, contain & label, keep it simple...and then plan to maintain. Following these steps will lead you to organizing just about anything!


We moved the lighter shelf to the other side of the office to go with it's match. Are these black shelves not sooo cute?? My client is talented at decorating...and you can see the treasures!


Notice the shelves have a home for everything and it is all labeled! Off to organize...have an amazing day!